2013-12-14

Watermarks and Photography

The debate continues. Should you watermark your images? Some people say yes, others say no. Why should you care? It is a complicated issue and one that will probably depend on your personal tastes.

Watermarks come in two main flavors: visible and invisible.

Visible

Visible watermarks are placed onto an image and obscure a part of it with text and/or a graphic. People use visible watermarks for one or more of the following reasons.

Protection

People place a copyright notice somewhere on the image. These go from very simple and discrete to large and annoying. 99% of these are the latter. Photographers who use this kind of watermark are usually doing so to protect their images from theft and use by unscrupulous people.

The thought is that the watermark is hard to remove and thus will deter thieves from using it.

Besides offering protection these types of watermarks allow viewers to identify who took the image and how they can contact them.

Branding

This type of watermark is used to brand the image, so that it is recognizable by people who know the artist. It may be a company logo, graphical signature, typeface or other artistic element.

These types of watermarks are often blended into the image to make them less noticeable.

Artists usually prefer this method as it is less likely to detract from the art.

Invisible

Invisible watermarks are only invisible to the naked eye and rely on a technique called steganography. There are various tools out there, but the best known is Digimarc. It uses special algorithms to hide digital information inside the image without effecting the look of the image. The service costs about $100.00US per year.

The thought is that if someone uses your image illegally you can recover the digital information inside the image to prove that it is yours if legal proceedings occur.

It is almost impossible to tell if one of these invisible watermarks exist, unless you use a tool like Digimarc or have access to the original image. If you have the original you can compare them bit by bit to determine if the data has been altered.

Opinion

My feeling is that if someone wants to steal your image, they will do it. There is no guaranteed way to protect your image on the web, except for not putting it there. Currently there is no technology available that is 100% theft proof.

With the tools that are available today, it will take less than 2 minutes to remove any visible watermark on an image unless it falls into the large and annoying category. If this is the reason why you are placing a watermark on your images then you are wasting your time.

NOTE: if you are putting watermarks on your images, please ensure that they are worth stealing.

I find most watermarks annoying. They ruin my viewing experience. My eye is attracted to the watermark and I cannot enjoy the image.

I prefer to use metadata within the file that I save on the web. This has all my copyright information and contact data. If someone want to reach me they can use that data to find me.

Lately there has been a lot of talk of Orphan Works. Governments across the globe want to pass laws that will protect people from copyright infringement claims if they make an effort to find an artist and can't. If a reasonable effort is made they can claim the image is orphaned and in the public domain. With the use of metadata stored with the file, I don't think they can claim this. Unfortunately some services strip metadata from the images so it is best to check to see if this is happening to your images.

Realistically, I can find the author of an image rather quickly using Google Image Search or other tools like Tineye.

Whether you use watermarks or not is up to you, but in reality they do not offer any more protection from thieves who are intent on stealing your art. Do you really want to track down and sue someone who may not even live in the same country as you? Do you want to spend all day, every day doing this? Is it worth it to you?

I would rather make art and let people see it. The alternative is to keep it in a box in your closet.


2013-10-09

Busy Busy Busy

I recently returned from a trip to Eastern Europe where I spent five weeks travelling. It was a blast!

We visited the following countries in no particular order:

  • Germany
  • Czech Republic
  • Poland
  • Slovakia
  • Austria
  • Hungary
We saw many things, but what shocked us the most was the sheer age of everything. In North America you are lucky to find buildings more than a 120 years old. There we visited churches that were celebrating their 950th birthdays!

We saw numerous castles most in ruins, but a couple which were still in pretty good shape. We also saw many Churches, Cathedrals, Basilicas and Chapels. We even visited a Synagogue and an Ossuary. I am not a religious person, but the sheer beauty of these places was beyond belief.

In Budapest I met up with a colleague from work who was visiting with her daughter. We spent a fantastic evening wandering the city and then having a great dinner at a local restaurant.

We also went to see an exhibit at the National Museum in Budapest celebrating the centennial of the famous photographer Robert Capa. He was an amazing war photographer. He died in 1954 by stepping on a land mine while photographing in Vietnam. I would highly recommend this exhibit if you are in the area.

The biggest hurdle now is that I have to download, process, backup and export all the images I took. With over 5000 images on 8 SD cards it will take quite some time to go through.

Stay tuned for more images and stories.

2013-08-17

What's in My Bag

Well, I haven't posted in a while due to preparations for an upcoming trip. My wife and I are headed to Eastern Europe for five weeks. It's going to be a lot of fun. We have been looking forward to this all year.

I thought I would run down the "What's in my Camera Bag" thing like other people have done, just so you get a sense of all the crap that I carry around with me. While I might not have all this on me for a single outing this is what I am carrying on the plane.


1x Nikon D800 camera
1x Nikon 16-35mm f4.0G lens
1x Nikon 50mm f1.8 lens
1x Nikon spare battery

1x Fuji XE-1 camera
1x Fuji 18-55mm f2.8-4.0 lens
1x Fuji spare battery

1x Samsung Chromebook
1x Western Digital 1TB USB external drive

1x Nexus 4 phone + earbuds
5x 32GB spare memory cards
1x Gorilla pod with ball head
1x Manfrotto 390 tripod
1x cleaning cloth, fluid and tissue

4x chargers (phone, chromebook, nikon, fuji) + wall adapter
1x money belt, passport, papers, etc.
1x combination padlock
1x towel and bathroom essentials
1x misc drugs (painkillers, allergy, etc.)

1x Lonely Planet Eastern Europe book
1x The Name of the Wind book

NOTE: any other clothes and misc. things will be stuffed into the red bag (seen at right). I have a small day bag that will carried on the plane.

2013-07-14

Adobe Lightroom and SQL Lite

I've been messing around with Adobe Lightroom 4 and SQL Lite recently trying to find a way to glean some useful information from my library catalog. Why? To learn something about it, to learn some new skills and why not.

So I downloaded SQLLiteSpy and hooked it up to my Lightroom catalog.

WARNING: don't do this while Lightroom is running or you could hose your catalog. It's always best to make a copy of one of your backup catalogs first, then work with that one. Really test the beejezus out of anything that does write operations. 

DISCLAIMER: I will not be held responsible for anything that you do to your catalog, images, computer,  mental health, others, etc. 

OK, if you are still reading and want to play around with your catalog then try hooking up SQLLiteSpy to your Lightroom catalog. You will have to tell it to look for .lrcat file extensions so pick "Any file".

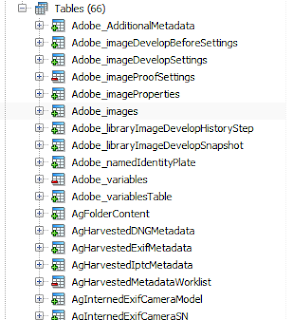
You should see a whole bunch of tables with Adobe or Ag prefixes. This is good.

Adobe SQLLite database
There are many interesting tables but you should first look at Adobe_images, AgLibraryFile, AgLibraryFolder and AgLibraryRootFolder. These tables are a great place to start and figure out the relationships of the data.
I was fiddling about with these tables and came up with the following query:
SELECT
root.absolutePath || folder.pathFromRoot || file.baseName || '.' || file.extension AS "FILEPATH"
FROM AgLibraryFile file
JOIN AgLibraryFolder folder ON file.folder = folder.id_local
JOIN AgLibraryRootFolder root ON folder.rootFolder = root.id_local
;
This query will show you the paths for all your images in the catalog.

Date and Time

I found that dates were the trickiest bit to figure out. Lightroom uses the SQL Lite REAL data type but there is absolutely no documentation on how they store it. I searched high and low on the internet and didn't come up with anything useful.

Using SQL Lite to find the current time you can do something like the following.
SELECT datetime('now', 'localtime');
But to figure out how Lightroom actually stores dates and times took some more effort. I read all the documentation on SQL Lite dates and times, searched all over the place for tutorials, etc. and came up with squat. It's like a coveted secret like the holy grail or how they get the caramilk inside the chocolate bar.

Well here it is, here is the secret. They use the year 2001 as their epoch. Weird! Anyway to calculate a date you need to do the following:
SELECT modTime, datetime(modTime,'unixepoch','localtime', '+31 years') FROM AgLibraryFile;
  • localtime adds/subtracts your timezone offset
  • unixepoch uses the unix start date of 1970-JAN-01
  • +31 years adds 31 years to the unixepoch to make it 2001
This will give you a proper date based on your timezone offset. Horray!

Advanced

Now, what I really wanted to attempt isn't available in Lightroom, so I thought I would write a query to do it. I wanted to get a set of records that were exported to my hard drive within the past 90 days. Why? Why not, and I might be able to use some kind of script (Perl, bash, batch, etc.) to work with that data. I wish Lightroom had this functionality. Maybe the Lightroom gods will listen and add this in a future release...
SELECT DISTINCT
  root.absolutePath || folder.pathFromRoot || file.baseName || '.' || file.extension AS "FILEPATH"
FROM AgLibraryFile file
JOIN AgLibraryFolder folder ON file.folder = folder.id_local
JOIN AgLibraryRootFolder root ON folder.rootFolder = root.id_local
JOIN Adobe_images image ON image.rootFile = file.id_local
JOIN Adobe_libraryImageDevelopHistoryStep step ON step.image = image.id_local
WHERE julianday('now', 'localtime') - julianday(step.dateCreated,'unixepoch','localtime', '+31 years') <= 90 
AND step.name LIKE ('Export - H%')
;
Good Luck and happy hacking.

2013-07-07

RAW vs. JPEG

The debate over RAW vs. JPEG has been around since digital photography existed. Unfortunately it is not as black and white as people try to make it out to be. Each format has its uses and like any tool at your disposal, it's all about knowing when to use it.

RAW

This file format is the raw data captured by the cameras sensor. Nothing is done to the data, it is lossless. It is written to the file as it is captured. The camera makes no assumptions about how it should interpret the data. The camera records all the relevant settings on the camera like aperture, shutter speed, ISO, lens data, white balance selection, etc. 

JPEG

Stands for Joint Photographic Experts Group. The format was released in 1992 for use on the web for photographic images. It is a lossy format, in that data is discarded when the image is created. JPEG is a visual format and is designed for perceptual viewing. The algorithms it uses to encode the data rely on the fact that the human eye can't see certain small changes in an images colour, contrast and details.

When recording a JPEG image you can select the quality of the image. This determines how much data is preserved in the final product. Cameras usually describe this as Basic, Normal and Fine. In software such as Adobe Photoshop this is usually a percentage from 1-100. The higher the percentage the less information is discarded. The downside is that the file is larger in size.

Comparison

File Sizes

The chart below shows a simple example of a single image comparing a RAW image to the same image saved as a JPEG. The JPEG image can save a lot of space on your cameras memory card or computer hard drive. At 90% a JPEG takes about 1/3 the space of a RAW image.

Below 50% JPEG images start to show compression artifacts. The image may start to look blocky. This is due to the compression algorithm used. It really depends on the image, but generally darker areas show this effect sooner than highlights. Since cameras usually only have 2 or 3 JPEG settings selecting Normal is probably the lowest you should go.

Percent %102030405060708090100
RAW Size (Kb)n/a33075
JPEG Size (Kb)653785919115216262643391960671004614868

Bit Depth

Raw images can be anywhere from 10 bits / colour channel all the way up to 14 bits. JPEG images are limited to 8 bits. For the average person this is gobbledygook. Where it matters is when you need to edit the image. The higher the bit depth of your image the more data that is recorded. This is the crux of the argument of RAW vs. JPEG.

A 14 bit RAW image captures 214 bits / colour channel which is 16384 distinct shades. On the other hand a JPEG image has 28 bits / colour channel or 256 distinct shades. Please refer to the image below to see a comparison of the various bit depths.

Strengths

JPEGs
  • great for viewing
  • widely supported format
  • very small file sizes
  • saves quickly (great for sports or journalism)
RAW
  • more data for editing

Conclusion

So like most things in life it really depends on what you want to do with the end result. If you intend to edit the image you should be shooting RAW. RAW images are also better since it a record of the sensor data as captured by the camera. It provides proof that the image has not been tampered with and requires specialized software to view it.

If you are just taking snapshots and are simply going to upload them to Facebook or Instagram then JPEG is probably the better choice. Also if you take lots of photos then JPEG might save you some money since RAW images are so much larger in size.

PS: When I go out shooting I shoot both RAW and JPEG. Why? My camera supports two memory cards. So the first card has all RAW images and the second card has all JPEGs. This is for safety just in case one card dies. The second card also allows me to upload JPEG images right away if I need to.

More Information

To learn more about RAW images check out https://en.wikipedia.org/wiki/Raw_image_format.
To learn more about JPEG images go to https://en.wikipedia.org/wiki/JPEG.

2013-04-21

Processing a Landscape Image

Exposure

The first exposure I took of this scene (N) looked flat and lacked highlight and shadow detail. It was taken at 1/13th, f5.6 at 100 ISO. I then bracketed the scene -2 and +2 stops to ensure that I would capture the highlight and shadow detail. 

If your scene has more exposure latitude than this, you will need to bracket further. I am not sure why Nikon decided that the maximum bracket is 1 stop on their cameras. They need to fix this!

NOTE: when you are bracketing exposures it is very important that you do not adjust your cameras aperture or move the camera. If you do, the images will not merge properly since the depth of field/focus will vary. You must vary your shutter speed, so it is recommended that you use your cameras Aperture Priority (A or Av) mode. Using a sturdy tripod will ensure that the camera does not move and I also recommend manually focusing your scene.

 Below are the resulting 3 exposures.

HDR

There are many tools available for merging exposures into a single image. Photoshop, Photomatix, HDR Efex Pro, etc. They all perform the same function of blending multiple images into one. This single image is called a High Dynamic Range (HDR) image. A normal photograph is 8 to 14 bits, where as a HDR image is 32 bits.

bits detail per color channel
8 256
12 4096
14 16384
16 65536
32 4294967296

As you can see from the table above a 32 bit image can retain a lot of detail! JPEG images are 8 bits and are optimized for viewing on a computer screen. JPEG images are highly compressed and therefore information is lost and cannot be recovered. This is why it is preferred to shoot in RAW, as that mode captures more detail and the image is not compressed. RAW mode is usually 10-14 bits in most cameras.

Once you produce your HDR image in the tool of your choice you will need to compress the exposure in the scene to something more suitable for editing. This is usually a 16 bit image. In Photomatix one of the common processes for doing this is called tonemapping. Other tools offer other options and effects.

HDR has a love/hate relationship with people. This is because it can get overused and can create some truly scary/awful results. Like most things in photography it is knowing when to use it and how much that make the difference. HDR is a tool and should be used only when required.

Below is the HDR image which has been tonemapped and reduced to 16 bits.
HDR image (tonemapped)

Photoshop

Inside Photoshop you can alter the image as much or as little as you want. I create a new layer for each new effect, and I use adjustment layers whenever I can.

Dodge/Burn Layer

Creating a dodge and burn layer in Photoshop is quite easy and recommended. You can do everything to the image itself, but this way you can undo mistakes with ease. 
  1. Create a new layer
  2. Fill with 50% gray
  3. Set layer blending mode to Overlay
  4. Choose the new layer
  5. Select either the dodge or burn tool
  6. Ensure that the exposure is < 20% and the brush has a soft edge.
Below is the result of dodging and burning the image. I turned off all the other layers so only the dodge/burn layer were visible. Areas that were burned are darker (more exposure) and areas that were dodged are lighter (less exposure). These tools are named after their darkroom equivalents.
Dodge/Burn layer
Original image plus the dodge/burn layer with blending mode set to Overlay.
HDR image plus Dodge/Burn layer
I then created a Levels adjustment layer and created a mask to only affect the sky. I adjusted the levels to bring out detail in the clouds and horizon. I created another adjustment layer and adjusted the color saturation and vibrance of the image. Below is the resulting, finished image.
Final touches (Curves, contrast, saturation)

2013-03-29

Making of an Image

In this tutorial you will see how I edit an image and learn how to apply a dodge/burn adjustment layer in Photoshop.

Step 1

This is a SOOC (Straight Out Of Camer) image. I took this with a Nikon D800 and 105mm Macro lens at 1/250th, f5.6 100ISO.
SOOC (straight out of camera) image

Step 2

I imported the image into Photoshop and did some basic editing. First I removed the distracting branch and flowers in the lower left corner to give the image some negative space. This helps to draw your eye into the image and to the subject. First I selected the entire area using the Lasso tool and then selected Fill and chose content-aware fill. Secondly I used the healing brush to fix any areas that didn't look right.

I also adjusted the color balance to make it warmer. I then zoomed into the image and went around it looking for dust, bugs, and other distracting bits of stuff and removed them with the healing brush. It is usually best to create an empty layer and then apply your healing brush changes to that layer. Just make sure to set it to sample all layers.

Before you start the next step you should duplicate all the layers and merge them into a single layer.
Edit image

Step 3

Now I ran some filters against the image to apply some effects. I performed another Iris blur with a heavier blur on the outside. I then added a curves adjustment layer to increase the contrast of the image. Next came a slight vignette and finally a slight guassian blur. The last effect was a color balance adjustment layer to warm the image.
Filter image

Step 4

The next step is where things get cool. I found that the image has some areas that are too dark or too light. To fix this most people will use the dodge or burn tool. What they don't do is use a layer mask to do it. To perform this you need to create a new layer and fill it with 50% gray. You then set the layer mode to Overlay. Since the adjustment layer is filled with 50% gray and is set to overlay the end result is no change to the image.

You then select the Dodge or Burn tool to lighten or darken areas of the image. Make sure to select a feathered brush and set its exposure to 10-30% and check protect tones. With a low exposure setting you apply the dodge or burn effect in small amounts. A soft brush avoids harsh edges. Protecting the tones avoids color shifts in the effect.

If you turn off the other layers you can see the changes to the dodge/burn layer. Whiter areas are dodged and darker areas are burned. 
Dodge/Burn Layer Mask

Step 5

Turn on all layers and you have the finished image. Enjoy.
Finished image
You can see a larger image on my Google+ page here.

2013-02-19

Green

It's not easy being green, especially if you are this florescent green seaweed. I found this seaweed growing on some rocks at China Beach, which is located near Sooke BC, Canada.

I posted this image for our photo clubs monthly theme, which you probably guessed is Green. If you live in the Sooke area and are interested in joining check out our Meetup group.

Green
© 2013 Mike Gabelmann. Creative Commons Attribution-NonCommercial-ShareAlike 3.0 Unported (CC BY-NC-SA 3.0)

2013-02-18

Geotagging Your Photos with Lightroom

Intro

Geo tagging your photos can be a real pain if you don't have a device that can do it out of the box. Luckily there are other ways to achieve the same result, it just takes a bit more work.

Equipment

You will need:
  1. Smart Phone with GPS or handheld GPS device
  2. Camera (compact, DSLR, mirrorless, etc.)
  3. Lightroom 4
NOTE: some DSLR cameras have the ability to attach a GPS module. If you have the module then all you need to do is attach it and your photos will be tagged auto magically.

Synchronize

To get the best results you must synchronize the time of your GPS device and your camera as closely as possible. This will allow the software to match up the images and locations more accurately.

It is not necessary to have the same time zone set on both devices, but it helps. Lightroom 4 can adjust this during the loading process if they are different.

Photography

When you go out to take some photos whether it be in the wilderness or the city all you need to do is turn on your GPS device and keep it on for the duration of your excursion. When you are done just shut the GPS off. 

Processing

OK, now you are back home. This is where the process gets a little more complicated.

First things first, you need to download your images and import them into Lightroom. I won't cover this part of the process in any detail since many people use different workflows. The basic premise is that you start Lightroom, insert the memory card into your computer and download the images that you want to keep.

The next step involves downloading the data from your GPS device. This is quite easy once you figure it out, unfortunately every device is different. Basically you want to export the data from your trip as a .GPX file. Save this file somewhere on your computer where you can find it easily.

Tagging

Step 1

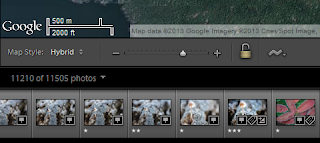
Click on the ~ icon.
You first need to click on the Map mode which is located at the top right hand side of the Lightroom interface. Click on the ~ icon at the bottom of the screen just above the filmstrip.


Step 2

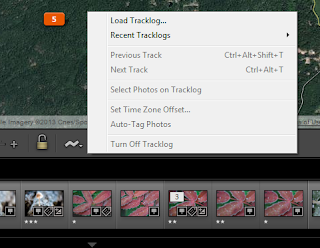
Select "Load Tracklog" and locate the .GPX file on your computer and click Open.

Click "Load Tracklog"
Select the correct track and time from the list of available tracks.

NOTE: if the timezone offset is different on your camera and GPS device you can adjust that now by clicking on the ~ icon and click "Set Time Zone Offset".


Step 3

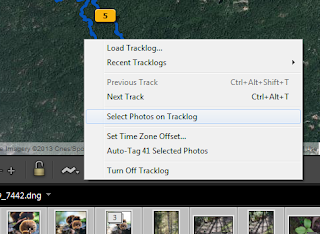
Click "Select Photos on Tracklog"
Now click on the ~ icon and click "Select photos on Tracklog". If everything goes well Lightroom should select all the images that you took on that track. If Lightroom selected any photos you should see them selected in the filmstrip (located at the bottom of the screen).


Step 4

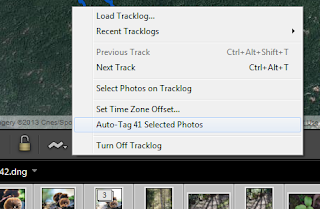
Click "Auto-Tag X Selected Photos"
You are almost done, click ~ again and click "Auto tag X Selected Photos" where X is the number of photos located along the track.


Step 5

Make any minor adjustments to the image locations if you think they are incorrect.


Step 6

If you have additional tracks that you want to tag you can select them from the Track listing and repeat steps 3-5.

Conclusion

Once you have done the whole process a couple of times it gets easier. This can save a lot of time if you were tagging your images manually. Combine geo tagging, photography with geo caching and make an adventure of it.

Have fun!

2013-02-16

What is Digimarc?

Digimarc is a paid service for protecting your photos. It allows you to embed information inside a photograph that you cannot see. The service costs $99.00US / year for the professional version and $49.00US for the basic version.

Digimarc does not place textual information in the meta data of the image file or a visible watermark on top of your image. It actually hides the information inside your image. This technique is called steganographyThis invisible watermark is not impossible to detect if you know how to look for it. Below is an image with a hidden Digimarc watermark.


So, you cannot see it, so how can you detect it? There are several ways to do this.

Read Watermark

Load the image into Adobe Photoshop or Elements and use the filter Digimarc and choose "Read Watermark".

Compare

Compare the original image to the watermarked image. If you are a thief chances are you don't have both images, but lets say you do. If you load both images into Photoshop or Elements and subtract the Digimarc image from the Original image and then enhance the result using curves you get something like the following image.


All those colored pixels are the information hidden in your photograph. You can see it only because we enhanced it using curves. If we didn't enhance it then the differences would be pretty minor.

To understand what all those dots mean is another matter and that would require information about the algorithm that Digimarc uses to embed the data which is most likely proprietary.

Thoughts

While this is not a perfect solution to protecting your images online, it is a step in the process. If someone wants to steal your work and it is worth stealing, they will. This just gives your photographs some extra protection.