Intro
Geo tagging your photos can be a real pain if you don't have a device that can do it out of the box. Luckily there are other ways to achieve the same result, it just takes a bit more work.
Equipment
You will need:
- Smart Phone with GPS or handheld GPS device
- Camera (compact, DSLR, mirrorless, etc.)
- Lightroom 4
NOTE: some DSLR cameras have the ability to attach a GPS module. If you have the module then all you need to do is attach it and your photos will be tagged auto magically.
Synchronize
To get the best results you must synchronize the time of your GPS device and your camera as closely as possible. This will allow the software to match up the images and locations more accurately.
It is not necessary to have the same time zone set on both devices, but it helps. Lightroom 4 can adjust this during the loading process if they are different.
Photography
When you go out to take some photos whether it be in the wilderness or the city all you need to do is turn on your GPS device and keep it on for the duration of your excursion. When you are done just shut the GPS off.
Processing
OK, now you are back home. This is where the process gets a little more complicated.
First things first, you need to download your images and import them into Lightroom. I won't cover this part of the process in any detail since many people use different workflows. The basic premise is that you start Lightroom, insert the memory card into your computer and download the images that you want to keep.
The next step involves downloading the data from your GPS device. This is quite easy once you figure it out, unfortunately every device is different. Basically you want to export the data from your trip as a .GPX file. Save this file somewhere on your computer where you can find it easily.
Tagging
Step 1
 |
| Click on the ~ icon. |
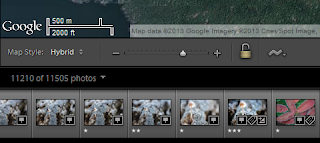
You first need to click on the
Map mode which is located at the top right hand side of the Lightroom interface. Click on the
~ icon at the bottom of the screen just above the filmstrip.
Step 2
Select "
Load Tracklog" and locate the .GPX file on your computer and click
Open.
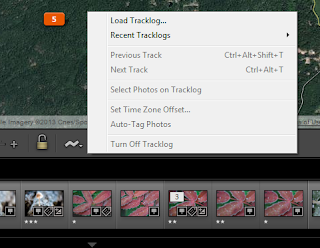 |
| Click "Load Tracklog" |
Select the correct track and time from the list of available tracks.
NOTE: if the timezone offset is different on your camera and GPS device you can adjust that now by clicking on the
~ icon and click "
Set Time Zone Offset".
Step 3
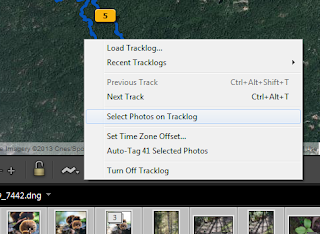 |
| Click "Select Photos on Tracklog" |
Now click on the
~ icon and click "
Select photos on Tracklog". If everything goes well Lightroom should select all the images that you took on that track. If Lightroom selected any photos you should see them selected in the filmstrip (located at the bottom of the screen).
Step 4
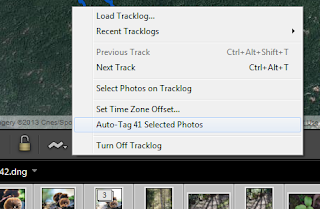 |
| Click "Auto-Tag X Selected Photos" |
You are almost done, click
~ again and click "
Auto tag X Selected Photos" where
X is the number of photos located along the track.
Step 5
Make any minor adjustments to the image locations if you think they are incorrect.
Step 6
If you have additional tracks that you want to tag you can select them from the Track listing and repeat steps 3-5.
Conclusion
Once you have done the whole process a couple of times it gets easier. This can save a lot of time if you were tagging your images manually. Combine geo tagging, photography with geo caching and make an adventure of it.
Have fun!


